Photoshop
Here you will learn how to manipulate and play with images in various ways.
![](https://static.wixstatic.com/media/80d6a4_a61dd9d049d54adda3dc68a7d36e5596.jpg/v1/fill/w_356,h_480,al_c,q_80,usm_0.66_1.00_0.01,enc_avif,quality_auto/80d6a4_a61dd9d049d54adda3dc68a7d36e5596.jpg)
![](https://static.wixstatic.com/media/80d6a4_d9a003dbc33847c59a24ba0e4245446b.jpg/v1/fill/w_555,h_463,al_c,q_80,usm_0.66_1.00_0.01,enc_avif,quality_auto/80d6a4_d9a003dbc33847c59a24ba0e4245446b.jpg)
![](https://static.wixstatic.com/media/80d6a4_f1c78bb2706448eba7aa68c2b25c7d52.jpg/v1/fill/w_973,h_583,al_c,q_85,usm_0.66_1.00_0.01,enc_avif,quality_auto/80d6a4_f1c78bb2706448eba7aa68c2b25c7d52.jpg)
![](https://static.wixstatic.com/media/80d6a4_261d7a4187de4a4993187d631675a5c4.jpg/v1/fill/w_973,h_583,al_c,q_85,usm_0.66_1.00_0.01,enc_avif,quality_auto/80d6a4_261d7a4187de4a4993187d631675a5c4.jpg)
![](https://static.wixstatic.com/media/80d6a4_1e00e7f916304198b2c73e140c96c812.jpg/v1/fill/w_973,h_583,al_c,q_85,usm_0.66_1.00_0.01,enc_avif,quality_auto/80d6a4_1e00e7f916304198b2c73e140c96c812.jpg)
![](https://static.wixstatic.com/media/80d6a4_14c035823e794457a50b635087816e07.jpg/v1/fill/w_973,h_583,al_c,q_85,usm_0.66_1.00_0.01,enc_avif,quality_auto/80d6a4_14c035823e794457a50b635087816e07.jpg)
![](https://static.wixstatic.com/media/80d6a4_67cdcc9a5464417bbd139b941d46fc2b.jpg/v1/fill/w_973,h_583,al_c,q_85,usm_0.66_1.00_0.01,enc_avif,quality_auto/80d6a4_67cdcc9a5464417bbd139b941d46fc2b.jpg)
![](https://static.wixstatic.com/media/80d6a4_7dff50e4de8642a287fb1583cacc69ae.jpg/v1/fill/w_973,h_583,al_c,q_85,usm_0.66_1.00_0.01,enc_avif,quality_auto/80d6a4_7dff50e4de8642a287fb1583cacc69ae.jpg)
![](https://static.wixstatic.com/media/80d6a4_6b3d59a3da714fa99ec45282871ee3c3.jpg/v1/fill/w_976,h_549,al_c,q_85,usm_0.66_1.00_0.01,enc_avif,quality_auto/80d6a4_6b3d59a3da714fa99ec45282871ee3c3.jpg)
![](https://static.wixstatic.com/media/80d6a4_9448aeb97d2945ab8dbc0d7d923b5c4d.jpg/v1/fill/w_973,h_583,al_c,q_85,usm_0.66_1.00_0.01,enc_avif,quality_auto/80d6a4_9448aeb97d2945ab8dbc0d7d923b5c4d.jpg)
![](https://static.wixstatic.com/media/80d6a4_7efce240115e44a38929c59f98965b79.jpg/v1/fill/w_631,h_522,al_c,q_80,usm_0.66_1.00_0.01,enc_avif,quality_auto/80d6a4_7efce240115e44a38929c59f98965b79.jpg)
Expand your image traced file. Then use the Direct Selection tool to select areas of the same color. Hold Shift to select multiple areas.
Use these settings to make sure your final project fits your monitor perfectly
Preset:
View:
Mode: Color
Palette:
Colors: 5
Advanced: Mess with these settings if you want.
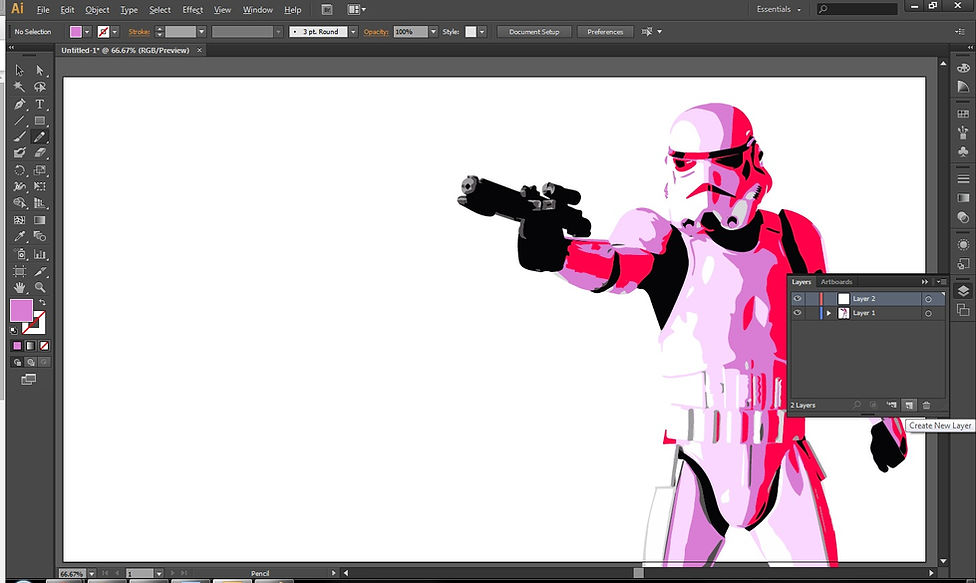
Replace colors with colors in a color family. In this case, I opted for Pinks and Purples in the RED color family.
Lock Layer 1. Create a new layer. Drag it below layer 1. We'll be working on layer 2 from now on.
Add work appropriate, positive images to the background. Notice how some elements overlap behind my stormtrooper.
TIme to save your work as both an *.ai illustrator file and then export your work as a *.jpg
Make sure to keep your work organized in your folders.